Configure TLS certificates
Complete this step when your deployment requires a customer-provided TLS certificate.
Certificate configuration is performed through the iVedha AI chat application:
https://copilot.opsflw.io
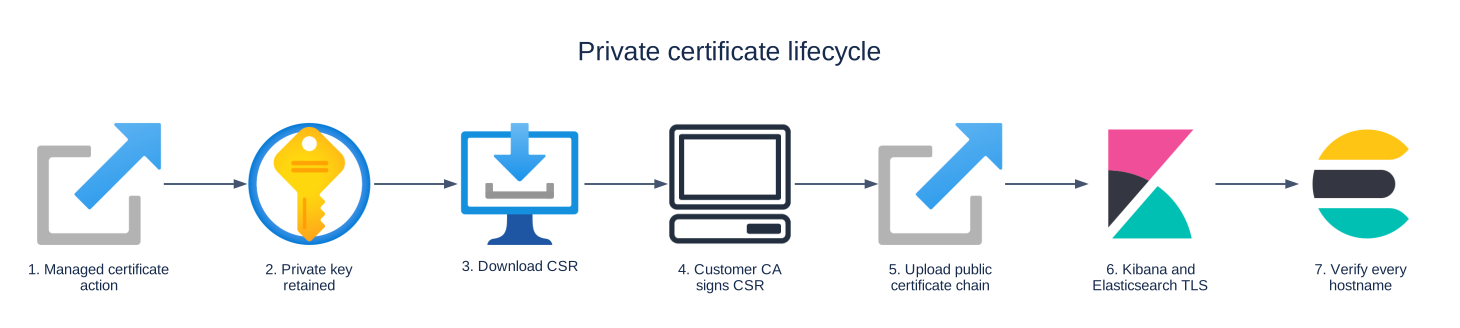
The platform generates the private key and certificate signing request (CSR). The private key remains inside the managed platform and is never provided to the customer.
Before you begin
Make sure:
- network access is configured;
- DNS resolves the service hostnames correctly;
- your organization can issue certificates from an appropriate certificate authority.
For a company-owned DNS domain, the certificate must be valid for the service hostnames created under that domain.
Request the certificate signing request
- Sign in to the iVedha AI chat application.
- Select or identify the deployment you want to configure.
- Ask the assistant to configure or update the TLS certificate.
- Complete any identity verification requested by the assistant.
- Request the CSR for the deployment.
- Download or save the CSR provided by the platform.
The platform generates a single CSR that covers all required service hostnames for the deployment, including:
- Kibana;
- Elasticsearch;
- Fleet;
- Logstash.
The required hostnames are included as Subject Alternative Names (SANs) in the CSR.
Do not generate a separate private key or CSR unless specifically instructed by iVedha support. The private key associated with the CSR remains inside the managed platform.
Sign the certificate
Submit the CSR to your organization's approved certificate authority.
The issued certificate must:
- match the private key associated with the CSR;
- include the required service hostnames;
- be within its validity period;
- include the required intermediate certificate chain;
- chain to a certificate authority trusted by the clients that will access the platform.
The exact certificate format required for upload is provided by the certificate workflow.
Upload the certificate
After your certificate authority issues the certificate:
- Return to the iVedha AI chat application.
- Select the same deployment.
- Continue the certificate configuration workflow.
- Upload the issued certificate and required intermediate certificate chain.
- Confirm the requested change.
- Wait for the platform to apply and synchronize the certificate.
Allow a few minutes for the updated certificate to become active across the platform.
Warning
Upload only the issued public certificate and certificate chain.
Never upload or send a private key. The private key generated with the CSR remains in the managed platform.
Verify the certificate
Test each Kibana, Elasticsearch, Fleet, and Logstash hostname that you plan to use.
SERVICE_HOSTNAME="<service-hostname>"

openssl s_client \
  -connect "${SERVICE_HOSTNAME}:443" \
  -servername "${SERVICE_HOSTNAME}" \
  -verify_return_error </dev/null
A successful validation should include:
Verify return code: 0 (ok)
Also confirm that:
- the certificate has not expired;
- the service hostname is included in the certificate;
- the certificate chain is trusted by the client.
Do not disable certificate verification to work around certificate errors.
If certificate configuration fails
First confirm that:
- DNS resolves the expected hostname;
- the correct CSR was signed;
- the certificate matches the requested hostnames;
- the required intermediate certificates were included.
For assistance, use:
- AI chat:
https://copilot.opsflw.io - Support portal:
https://support.ivedha.com/
Provide the deployment reference from your Your deployment is ready notification.
Next step
After certificate validation succeeds, continue to verify access.